
目录
基于Air780E的短信接收二开
简介
因为 RPA 中获取报表等信息采集因素需要接受手机验证码,所以购买基于宙合 Air780E 的短信接收器用于短信转发。其中集成了 luatOS,可以通过 lua 脚本进行自定义请求接口以满足短信获取的需求。
这篇文章以短信接收器端烧录、后端接口部署两部分进行记录。
短信接收器烧录
外观
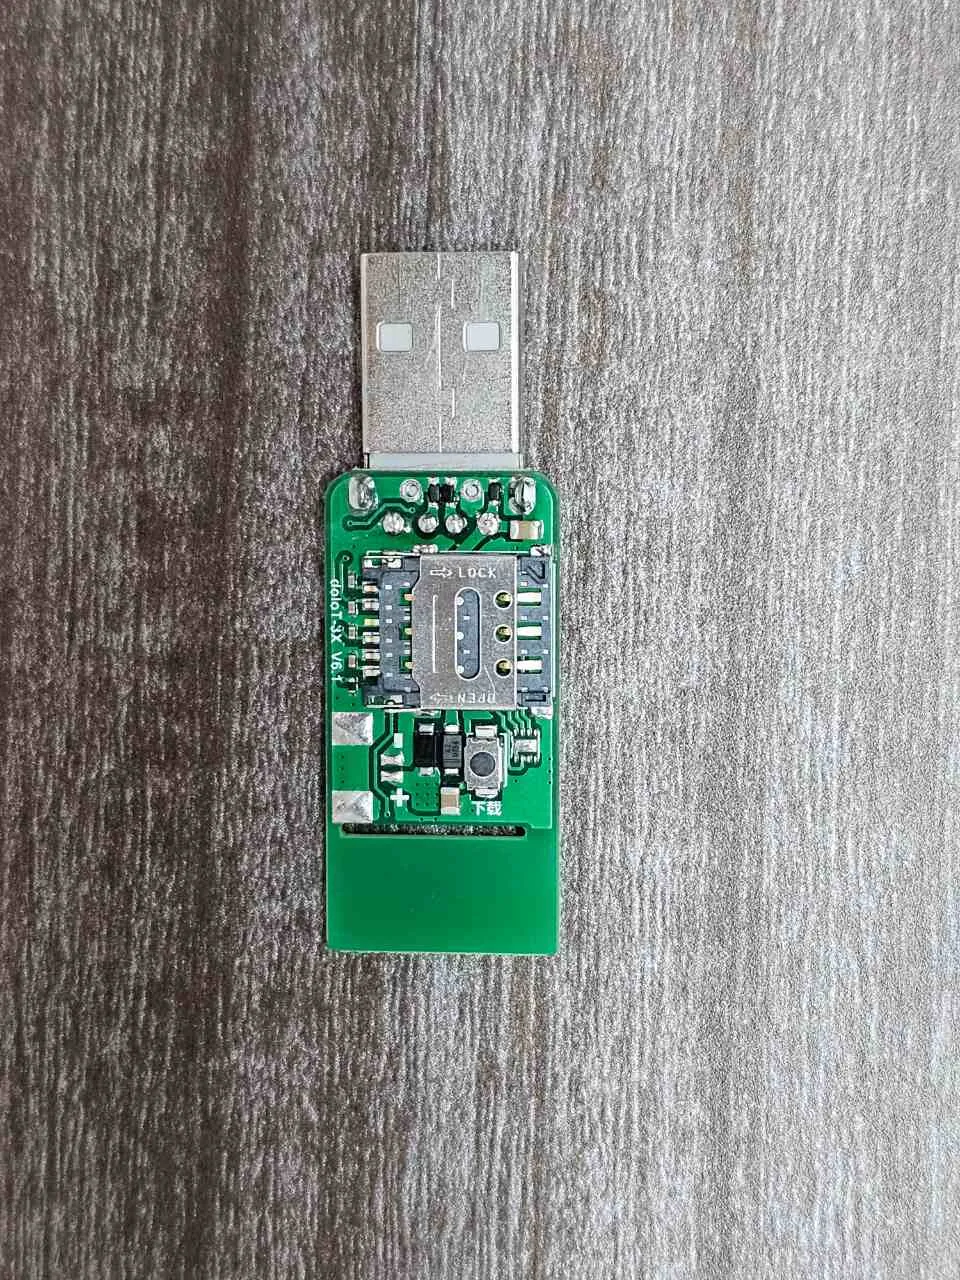
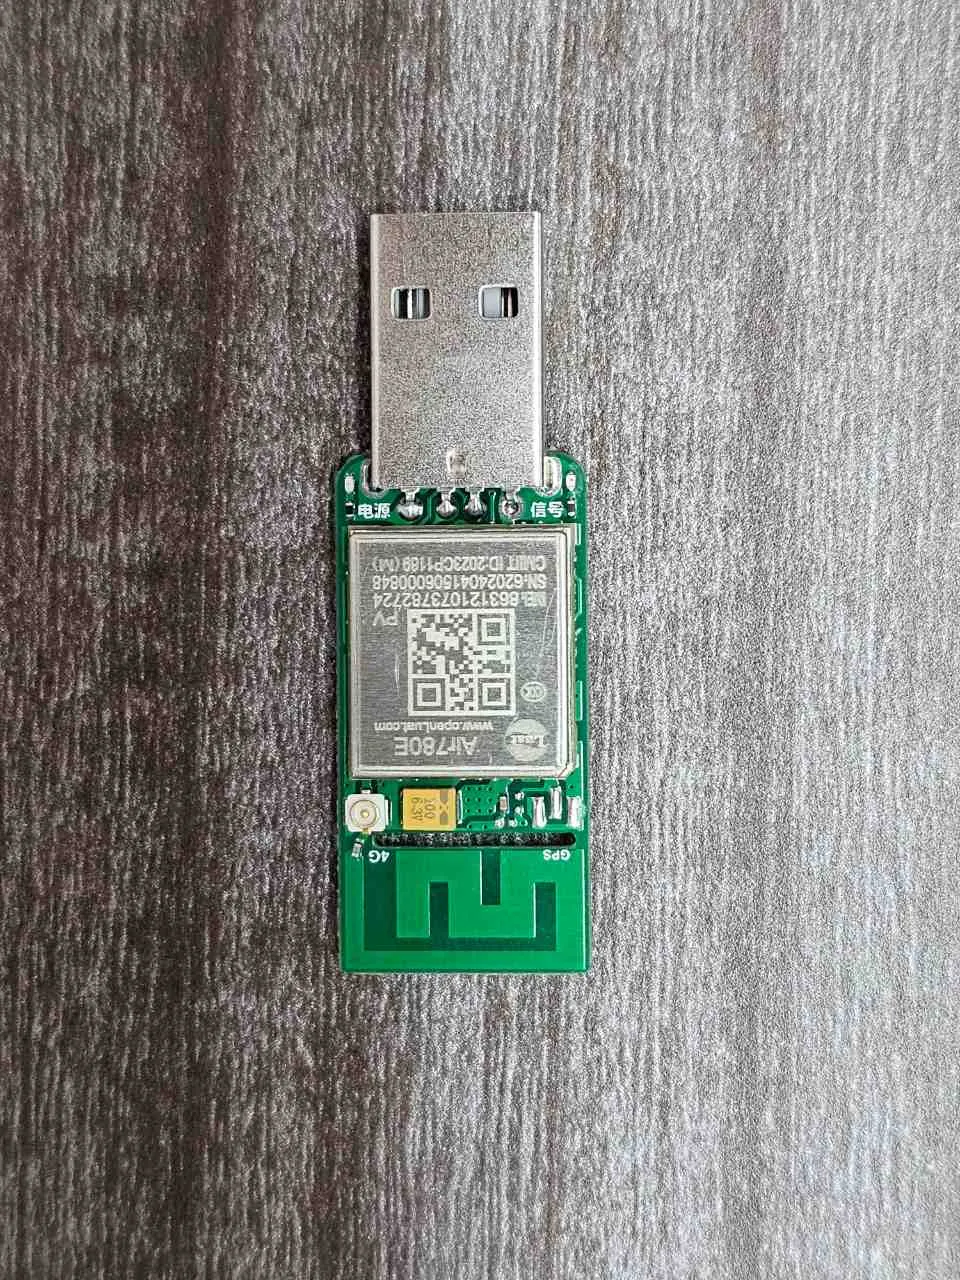
购买链接:淘宝链接
参考视频:B站链接
参考文档:合宙air780e硬件实现短信转发 最终版本 全网通 通用 支持电信 (yuque.com)
烧录后通过 usb 供电,电源给予 5v1a 即可。
烧录方法
目录
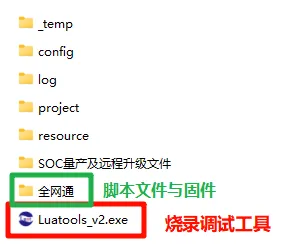
全网通目录下:
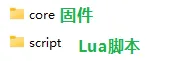
如何烧录?
需要根据情况修改 script 中的脚本
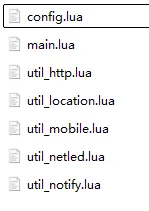
修改 script 中的 config.lua
右键使用记事本打开 config.lua ,主要关注第 4 行和第 19 行
luareturn {
    -- 通知类型, 支持配置多个
    -- NOTIFY_TYPE = {"telegram", "pushdeer", "bark", "dingtalk", "feishu", "wecom", "pushover", "inotify", "next-smtp-proxy", "gotify"},
    NOTIFY_TYPE = {"dingtalk","diy","diy1"},
    -- telegram 通知配置, https://github.com/0wQ/telegram-notify
    TELEGRAM_PROXY_API = "",
    TELEGRAM_TOKEN = "",
    TELEGRAM_CHAT_ID = "",
    --
    -- pushdeer 通知配置, https://www.pushdeer.com/
    PUSHDEER_API = "https://api2.pushdeer.com/message/push",
    PUSHDEER_KEY = "",
    --
    -- bark 通知配置, https://github.com/Finb/Bark
    BARK_API = "https://api.day.app",
    BARK_KEY = "",
    --
    -- dingtalk 通知配置, https://open.dingtalk.com/document/robots/custom-robot-access
    DINGTALK_WEBHOOK = "*",
    --
    -- feishu 通知配置, https://open.feishu.cn/document/ukTMukTMukTM/ucTM5YjL3ETO24yNxkjN
    FEISHU_WEBHOOK = "*",
    --
    -- wecom 通知配置, https://developer.work.weixin.qq.com/document/path/91770
    WECOM_WEBHOOK = "*",
    --
    -- pushover 通知配置, https://pushover.net/api
    PUSHOVER_API_TOKEN = "",
    PUSHOVER_USER_KEY = "",
    --
    -- inotify 通知配置, https://github.com/xpnas/Inotify 或者使用合宙提供的 https://push.luatos.org
    INOTIFY_API = "https://push.luatos.org/XXXXXX.send",
    --
    -- next-smtp-proxy 通知配置, https://github.com/0wQ/next-smtp-proxy
    NEXT_SMTP_PROXY_API = "",
    NEXT_SMTP_PROXY_USER = "",
    NEXT_SMTP_PROXY_PASSWORD = "",
    NEXT_SMTP_PROXY_HOST = "smtp-mail.outlook.com",
    NEXT_SMTP_PROXY_PORT = 587,
    NEXT_SMTP_PROXY_FORM_NAME = "Air780E",
    NEXT_SMTP_PROXY_TO_EMAIL = "",
    NEXT_SMTP_PROXY_SUBJECT = "来自 Air780E 的通知",
    --
    -- gotify 通知配置, https://gotify.net/
    GOTIFY_API = "",
    GOTIFY_TITLE = "Air780E",
    GOTIFY_PRIORITY = 8,
    GOTIFY_TOKEN = "",
    --
    -- 定时查询流量间隔, 单位毫秒, 设置为 0 关闭 (建议检查 util_mobile.lua 文件中运营商号码和查询代码是否正确, 以免发错短信导致扣费, 收到查询结果短信发送通知会消耗流量)
    QUERY_TRAFFIC_INTERVAL = 0,
    --
    -- 定时基站定位间隔, 单位毫秒, 设置为 0 关闭 (定位成功后会追加到通知内容后面, 基站定位本身会消耗流量, 通知内容增加也会导致流量消耗增加)
    LOCATION_INTERVAL = 0,
    --
    -- 开机通知 (会消耗流量)
    BOOT_NOTIFY = true,
    --
    -- 通知内容追加更多信息 (通知内容增加会导致流量消耗增加)
    NOTIFY_APPEND_MORE_INFO = true,
    --
    -- 通知最大重发次数
    NOTIFY_RETRY_MAX = 0,
    --
    -- 开启低功耗模式, USB 断开连接无法查看日志, RNDIS 网卡会断开
    LOW_POWER_MODE = false,
}
第 4 行表示需要通过什么方式进行通知,默认为钉钉和数据库(diy)还有通知影刀数据链接器后端(diy1)
第 19 行填入钉钉机器人地址,配置验证方式为自定义关键词”本机号码“
打开 util_notify.lua 修改后端接口地址和 token
如不需要修改则跳过此步
因为放出至公网所以配置了 token 字段如此处修改了需要同步修改后端
这里增加了自定义的http请求
lualocal notify = {
    -- 发送到 diy 需要改
    ["diy"] = function(msg)
        diy_url = "*"
        local header = {
            ["Content-Type"] = "application/json; charset=utf-8"
        }
        log.info(msg)
        -- 这个就是请求文本
        -- 本机号码
        local number = mobile.number(mobile.simid())
        if not number then
            -- 无法识别手机号 手动指定
            log.info("notifyCode:28-NoNumber")
            number = GloablNumber
        end

        local send_body = {
            token = "***",
            receiver_phone = number,
            sms = msg
        }
        local json_data = json.encode(send_body)
        -- LuatOS Bug, json.encode 会将 \n 转换为 \b
        json_data = string.gsub(json_data, "\\b", "\\n")
        log.info("util_notify", "POST", diy_url)
        log.info("util_notify", "POST", send_body)
        log.info("util_notify", "POST", json_data)
        return util_http.fetch(nil, "POST", diy_url, header, json_data)
    end,
刷入固件和脚本
::: !!!!!!请勿在共享目录中直接打开文件!如需要刷固件请下载至本地运行!!!!!! :::
-
打开
-
点击右上角项目管理测试
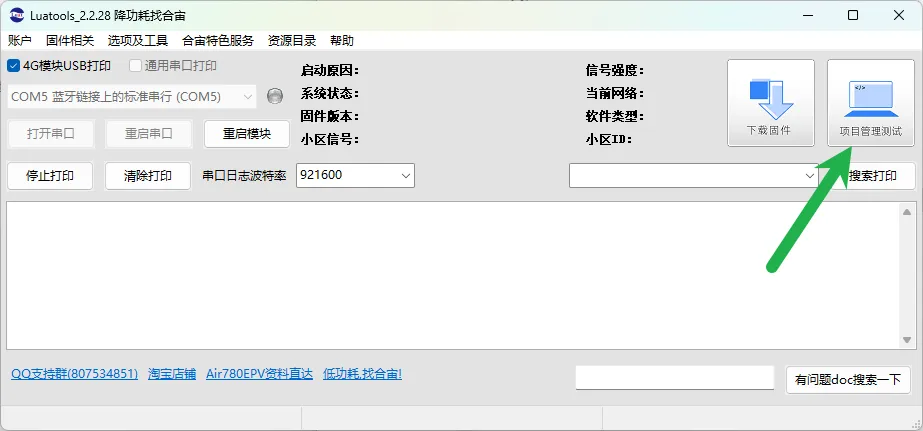
-
点击创建项目,随意输入名称
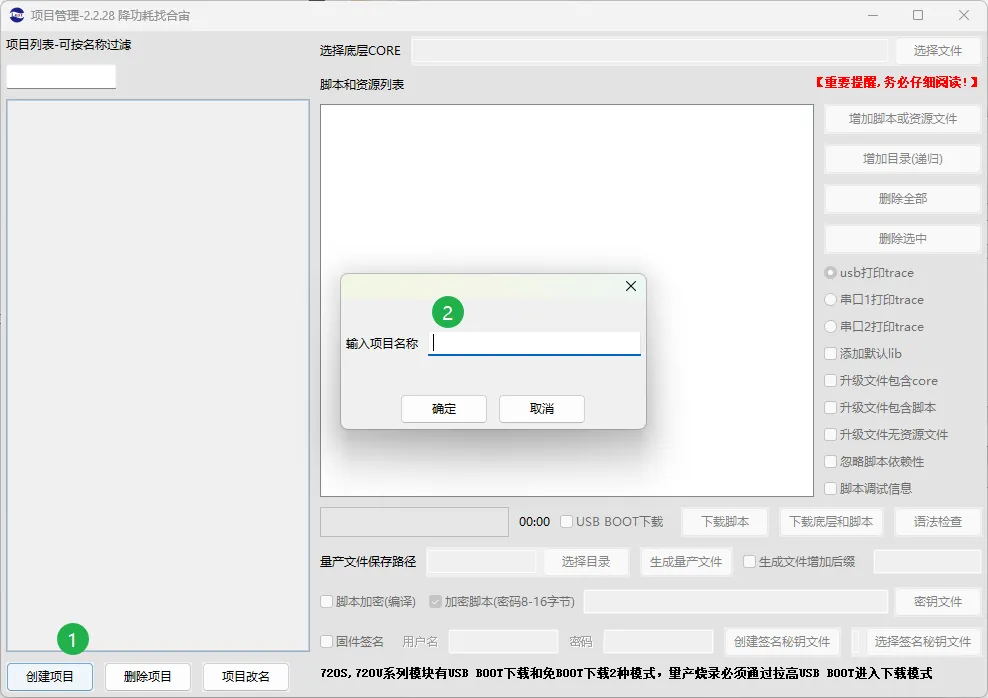
-
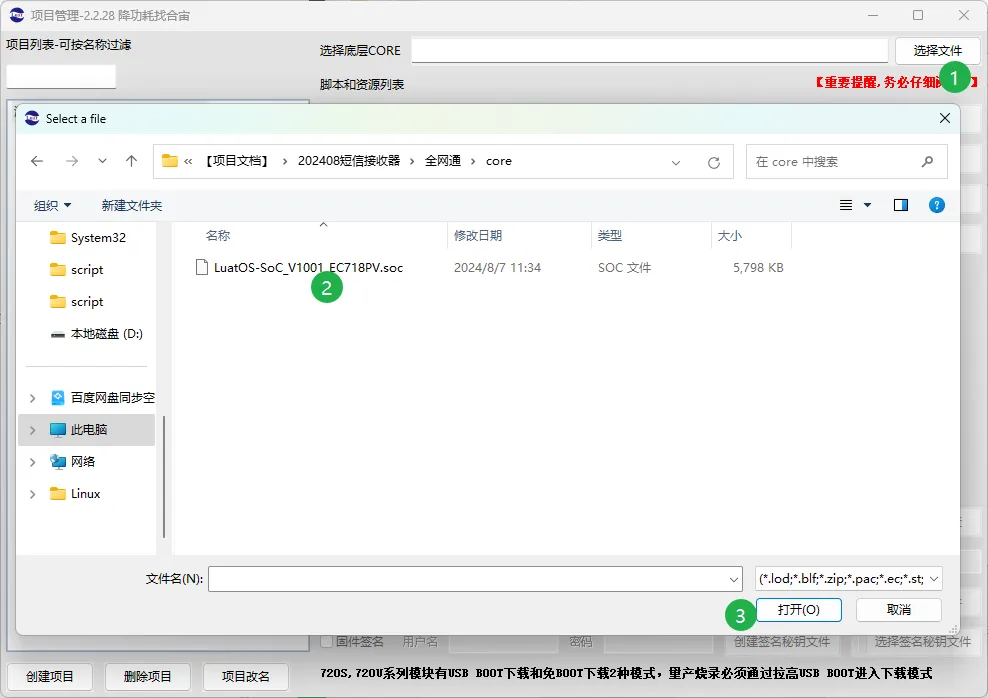
点击右上角选择文件,选择 core 文件
-
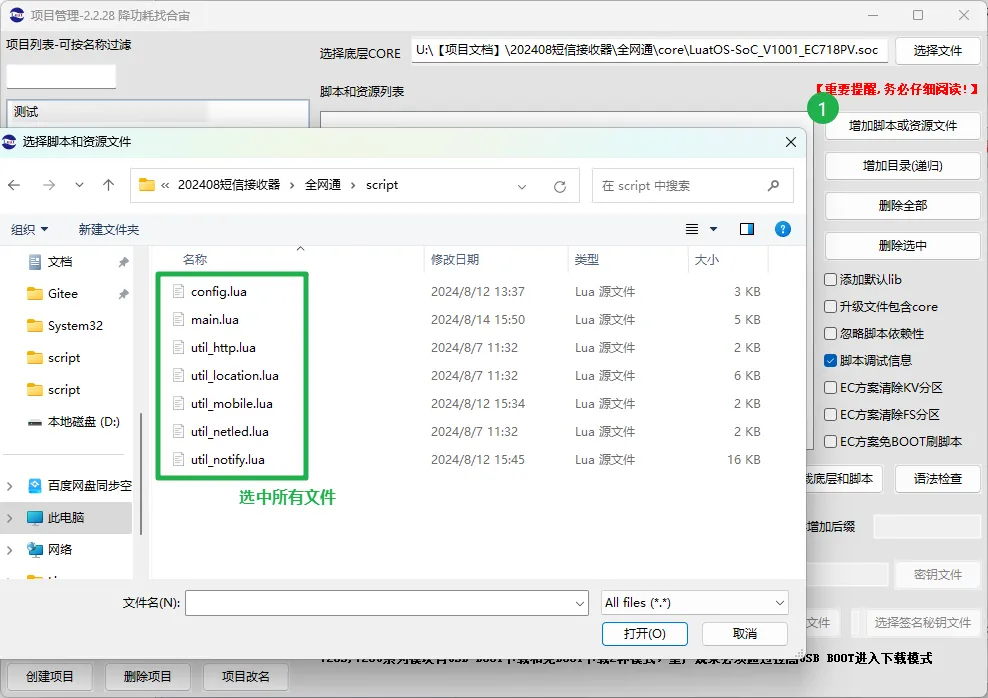
点击增加脚本或资源文件选中 script 中的所有文件并添加
-
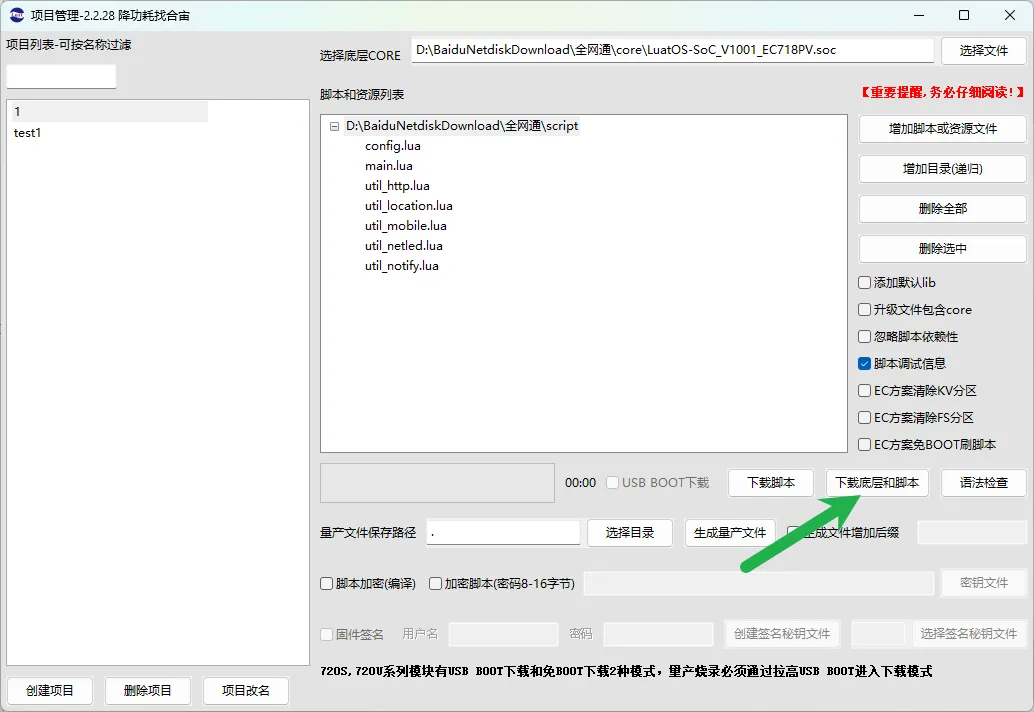
点击下载底层和脚本
-
编译完成后出现提示
 时,按住
时,按住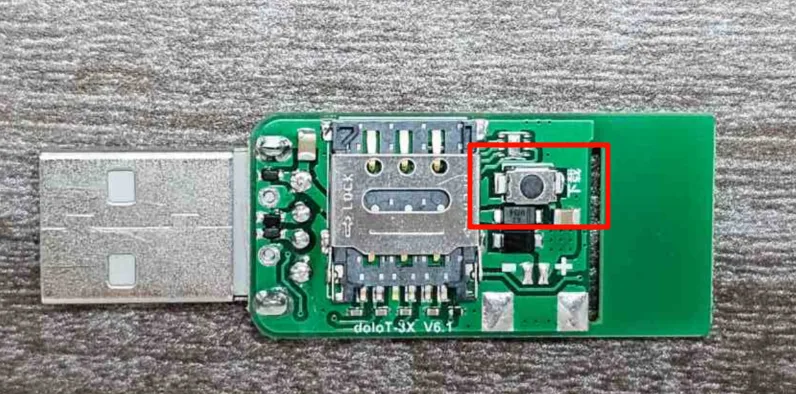 下载键插入电脑,亮灯后松手等待刷入完成即可。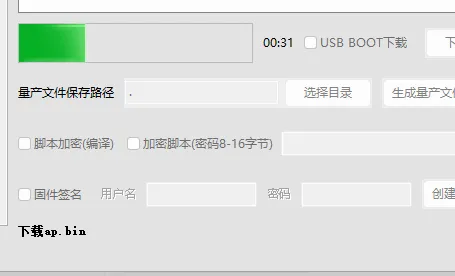
-
正常刷入后能识别 sim 卡后即可正常转发。
:::
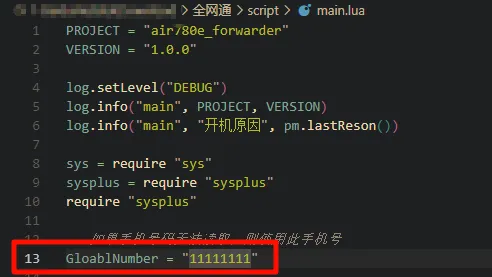
如显示本机号码为 111111 则说明无法识别手机号,请前往 script/main.lua 的第 13 行手动修改手机号后再次刷入!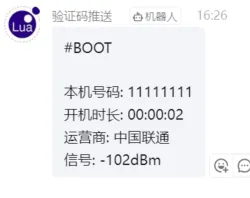
 :::
:::
后端部署
后端现部署在云服务器的 dockers 容器上,使用同样运行在 docker 中的 Nginx Proxy Manager 进行代理。
文件结构
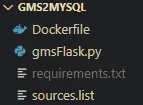 本体为 gmsFlask.py,使用 python 的 flask 库实现了后端接口。sources.list 、requirements.txt、Dockerfile 均为容器构建时需要的文件。
gmsFlask.py
9~19 均为 mysql 和 sqlserver 的数据库连接参数,默认 mysql 连接的数据库为 192.168.0.164 数据库与表名为 yd_db.sms_msg。mysql 连接的数据库地址为 192.168.1.8 数据库名与表名为 PRA smsMsg,表结构一致。
python
from flask import Flask, request,abort
import json
import sys
import pyodbc
import pymysql
import inspect

app = Flask(__name__)
MysqlIP = "*"
MysqlUsers = "sms"
MysqlPWD = "*"
MysqlQuery = "INSERT INTO yd_db.sms_msg (phoneNumber, msg) VALUES (%s, %s)"

sqlserverIP = "***"
sqlserverUsers = "sa"
sqlserverPWD= "*"
sqlserverDB = "RPA"
sqlserverQuery = "INSERT INTO smsMsg (phoneNumber, msg) VALUES (?, ?)"
toSqlServerPhoneNumber = "*"


def checkRet(ret,defName):
    if ret:
        print(f"{defName} success commit")
        return
    print(f"{defName} commit fail")

#连接mysql
def connMySql(data):
    conn = pymysql.connect(host=MysqlIP, user=MysqlUsers, password=MysqlPWD, port=3306)

    cursor = conn.cursor()
    sql = MysqlQuery
    ret = cursor.execute(sql, data)
    checkRet(ret,inspect.currentframe().f_code.co_name)
    conn.commit()
    cursor.close()

def connSqlServer(data):
    # 创建连接字符串
    connection_string = f'DRIVER={{ODBC Driver 17 for SQL Server}};SERVER={sqlserverIP};DATABASE={sqlserverDB};UID={sqlserverUsers};PWD={sqlserverPWD}'
    # 建立连接
    conn = pyodbc.connect(connection_string)
    # 创建游标对象
    cursor = conn.cursor()
    # 执行SQL查询
    sql = sqlserverQuery
    ret = cursor.execute(sql,data)
    checkRet(ret,inspect.currentframe().f_code.co_name)
    # 关闭连接
    conn.commit()
    cursor.close()
    conn.close()

@app.route('/info', methods=["POST"])
def hello():
    print(request.method)
    if request.method == "POST":
        req_data = json.loads(str(request.data, 'utf-8'))
        if str(req_data["token"]) != "****" or "receiver_phone" not in req_data.keys() or not req_data["receiver_phone"]:
            abort(400)

        sjh=str(req_data["receiver_phone"])
        sms=str(req_data["sms"])
        dat= (sjh,sms)

        #连接数据库向两边写数据
        connMySql(dat)
        # print("okkkkkkk")
        if toSqlServerPhoneNumber in sjh:
            connSqlServer(dat)

        return "conmmit"

@app.route('/gms', methods=["GET"])
def gmsSend():
    print(request.args.get("content"))
    return "ok"

@app.route('/test',methods=["POST","GET"])
def test():
    return 'Hello World!'

if __name__ == '__main__':
    app.run(host="0.0.0.0",port=8125)#gai duanko
    # connSqlServer(("*","test111"))
Dockerfile
DockerfileFROM python:3.12-slim

EXPOSE 5002

# Keeps Python from generating .pyc files in the container
ENV PYTHONDONTWRITEBYTECODE=1

# Turns off buffering for easier container logging
ENV PYTHONUNBUFFERED=1

# Install pip requirements
COPY requirements.txt .
RUN rm -rf /etc/apt/sources.list
ADD sources.list /etc/apt/
RUN python -m pip install -r requirements.txt -i https://pypi.tuna.tsinghua.edu.cn/simple && apt-get clean && apt-get update && apt-get install -y unixodbc unixodbc-dev curl apt-transport-https gnupg && rm -rf /var/lib/apt/lists/*
RUN curl https://packages.microsoft.com/keys/microsoft.asc | apt-key add - \
    && curl https://packages.microsoft.com/config/ubuntu/20.04/prod.list > /etc/apt/sources.list.d/mssql-release.list
RUN apt-get update && ACCEPT_EULA=Y apt-get install -y msodbcsql17

WORKDIR /app
COPY . /app

# Creates a non-root user with an explicit UID and adds permission to access the /app folder
# For more info, please refer to https://aka.ms/vscode-docker-python-configure-containers
RUN adduser -u 5678 --disabled-password --gecos "" appuser && chown -R appuser /app
USER appuser

# During debugging, this entry point will be overridden. For more information, please refer to https://aka.ms/vscode-docker-python-debug
CMD ["gunicorn", "--bind", "0.0.0.0:5002", "gmsFlask:app"]
镜像构建
将所有文件拷贝至服务器后运行
shelldocker build -t gms2mysql:v1 .
#构建完成后运行
docker run --name gmsserver -p 1825:5002  -d gms2mysql:v1
意思是使用 gms2mysql
镜像起一个叫 gmsserver 的容器将本机的 1825 端口映射到容器内 5002然后通过Nginx Proxy Manager 将请求代理至本机 1825 端口
构建时如卡住则需要进行 docker 换源或者是进行代理,sources.list 内已进行 apt 换源。